File Mover Blog

  • 06 Jan

    Moving data from lab computers

    A while ago we received a request from a customer to move data from lab computers. Some of those lab computers were XP and could not be upgraded. The idea was to work with scripts on the lab computers which would trigger the moving of data.

    Develop a script that would be installed on each of the instrument computers. The script will be used to move the data from the lab computers to a server. Once the measurement is completed, the script will be activated by the user and the file transfer should start.

    We proposed the following to the customer:

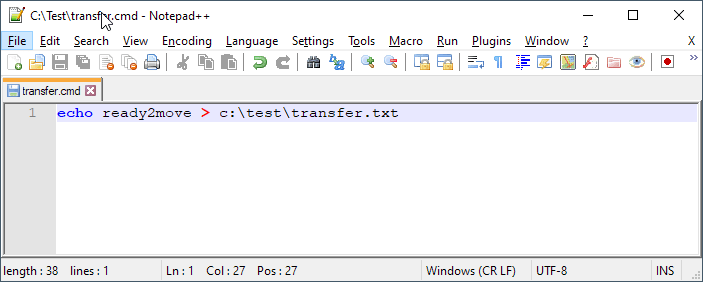
    1. Create a simple command (cmd) file on each lab computer that when activated would create a ‘dummy’ file in a shared folder (i.e. transfer.txt )

    Limagito File Mover moving data from lab computers
    2. Put this command file on the desktop (or a shortcut) of the lab computer
    3. Run this command also when the user logs off ( https://www.tek-tips.com/viewthread.cfm?qid=606106 )
    4. The File Mover, installed on a central server, would check if this ‘dummy’ file exists and in case it does, will move the files to the server (and also delete the dummy file).
    The advantage is that you can use a recent version of our File Mover and also the effort you need to spend on XP is very little.
    They agreed and we installed our Limagito File Mover on their Windows 2019 server.  We are scanning all their lab computers for this ‘transfer.txt’ file. It it exists, then we move the data from the lab computer to a storage server. A very important part was logging and that is why we enabled full debug mode history logging. The dummy ‘transfer.txt’ file is deleted after a successful move of all data,

    Update 15/01/2022

    The customer created a command file (transfer.cmd) with the following content. This command file is installed on all their lab computers and will create a dummy transfer.txt file in the C:\Data folder.

    ********************************
    @ECHO OFF
    C:
    CD\
    CLS
    
    :MENU
    CLS
    
    ECHO ============= Choose to move Data to server! =============
    ECHO ============= Your Experment muts be complete! =============
    ECHO ============= If not complete press 2 now! =============
    ECHO -------------------------------------
    ECHO 1.  Move of Lab Data to Server
    ECHO 2.  Do nothing and exit
    ECHO -------------------------------------
    ECHO ==========PRESS 'Q' TO QUIT==========
    ECHO.
    
    SET INPUT=
    SET /P INPUT=Please select a number:
    
    IF /I '%INPUT%'=='1' GOTO Selection1
    IF /I '%INPUT%'=='2' GOTO Quit
    IF /I '%INPUT%'=='Q' GOTO Quit
    
    CLS
    
    ECHO ============INVALID INPUT============
    ECHO -------------------------------------
    ECHO Please select a number from the Main
    echo Menu [1-2] or select 'Q' to quit.
    ECHO -------------------------------------
    ECHO ======PRESS ANY KEY TO CONTINUE======
    
    PAUSE > NUL
    GOTO MENU
    
    :Selection1
    
    @echo **The Lab Data is scheduled to move to the server**
    :input
    echo > "c:\xladata\transfer.txt"
    ECHO ==============THANKYOU===============
    ECHO -------------------------------------
    ECHO ======PRESS ANY KEY TO CONTINUE======
    
    PAUSE>NUL
    EXIT
    
    
    @ set INPUT=
    @ set  /P INPUT=Type input: %=%
    if "%INPUT%"=="" goto input
    :exit
    CLS
    
    ECHO ==============THANKYOU===============
    ECHO -------------------------------------
    ECHO ======PRESS ANY KEY TO CONTINUE======
    
    PAUSE>NUL
    EXIT
    
    :Selection2
    
    :Quit
    CLS
    
    ECHO ==============THANKYOU===============
    ECHO -------------------------------------
    ECHO ======PRESS ANY KEY TO CONTINUE======
    
    PAUSE>NUL
    EXIT


    If you need any info about this ‘Moving data from lab computers’, please let us know.

    #FileTransfer

    Best regards,

    Limagito Team

    By Limagito-Team WIN ,
  • 27 Dec

    Execute a command line tool after processing multiple files successfully

    Q: Howto execute a command line tool after processing multiple files successfully. I have a rule that moves 1 or more files and starts a uses the command option After copy/move/delete success to run an executable. I could get 1 file or I could get more every day. If I receive 1 file everything is good but if I receive more than 1 file then the rule is trying to process all the files individually where I need it to run the exe after all files are moved. Is there a setting to move all the files then run the exe, I think I’ve had this issue before but I just can’t remember how I fixed it.

    A: We added a new option in version v2021.12.26.0 to achieve this.

    Command, On Rule End Execute Condition option (v2021.12.26.0) [+]

    In your case we should not use ‘After copy/move/delete success’ because this is triggered for each file. Instead, select and enable the ‘On Rule End’ Command instead AND with ‘On Rule End’ selected do enable the ‘All files successful’ Execute Condition option in the Advanced Tab.

    Limagito File Mover Execute Command Condition

    #FileTransfer

    If you need any info about this ‘after processing multiple files’ question, please let us know.

    Best regards,

    Limagito Team

    By Limagito-Team Command , , ,
  • 18 Dec

    Sending emails using GMail SMTP with OAuth2 authentication

    Q: Sending emails using GMail SMTP with OAuth2 authentication. I am trying to set up an outgoing email notification that will happen when a file moves to it’s destination.

    8th of May 2022, we are working on an update because of: OAuth out-of-band (oob) flow will be deprecated

    Instead of the Google URI urn:ietf:wg:oauth:2.0:oob you’ll have to use a loopback (IP) address as Redirect URI like http://127.0.0.1 or http://localhost

    In this update (version v2022.5.8.0) a redirect port will be added which is only needed during the OAuth2 verification setup.

    Please check: Update Info


    A: Yes this is possible.

    First check if you enabled the GMail API in your account: https://support.google.com/googleapi/answer/6158841?hl=en

    Secondly we’ll need credentials ‘Client ID and Client Secret’  for the OAuth2 authentication: https://support.google.com/googleapi/answer/6158857?hl=en&ref_topic=7013279

    We added some screenshots to help you with the setup.

    Limagito File Mover SMTP Setup

    Don’t forget the Security Options:

    Limagito File Mover SMTP Setup

    OAuth2 Setup:

    Limagito File Mover SMTP OAuth2 authentication

    Please add the following information:
    – Authorization Endpoint URL: https://accounts.google.com/o/oauth2/v2/auth
    – Token Endpoint URL: https://www.googleapis.com/oauth2/v4/token
    – Client ID
    – Client Secret
    – Scope: https://mail.google.com/
    – Redirect URI: urn:ietf:wg:oauth:2.0:oob
    Click GET and your browser will open. Follow steps and copy / paste the code from your browser in the ‘Auth Code’ field.
    This will automatically fill in Refresh Token and Access Token. Do not forget to <Save> afterwards.

    Limagito File Mover SMTP OAuth2 authentication

    RunTime Log Result when testing:

    Limagito File Mover RunTime log result

    #FileTransfer

    If you need any info about this ‘GMail SMTP’ question, please let us know.

    Best regards,

    Limagito Team

1 51 52 53 54 55 56 57 136
SEARCH