Basic language scripter engine
24th of November 2025
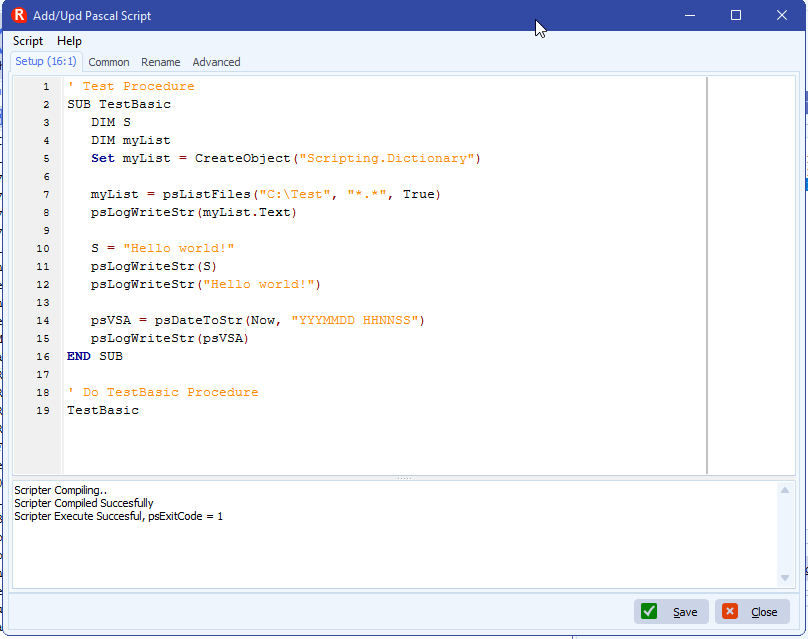
We’re excited to announce that FileMover now supports BASIC scripting alongside our existing Pascal scripting language. This addition reflects our commitment to making FileMover accessible to users of all skill levels while maintaining the power and flexibility that advanced users love.
Why BASIC?
BASIC’s straightforward syntax makes automation more approachable for users new to scripting, while its familiar structure allows experienced administrators with VBScript or Visual Basic backgrounds to hit the ground running. Many IT professionals have used BASIC-style languages throughout their careers, and this addition lets them leverage that existing knowledge.
Choose What Works for You
Both scripting languages provide full access to FileMover’s capabilities. Use Pascal when you need maximum performance and advanced features, or choose BASIC for quick automation tasks and simpler logic. You can even use both languages in different rules within the same configuration.
Existing Users
If you’re already using Pascal scripting, nothing changes – your scripts continue to work exactly as before. BASIC is simply an additional option when you need it.
We believe giving you choice in how you automate your workflows makes FileMover a more versatile tool for your organization.
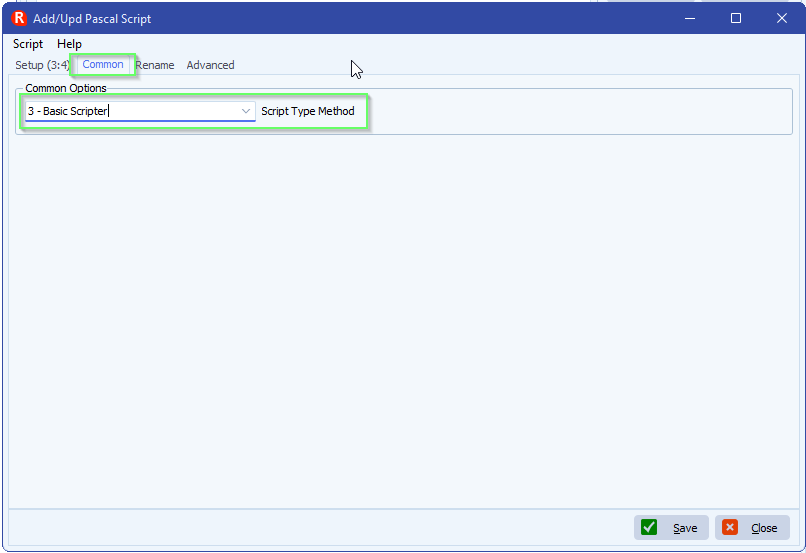
- Common Tab > Script Type Method > Select ‘3 – Basic Scripter’
Functions available (refer to MSDN documentation for the explanation of each function):
- Asc
- Atn
- CBool
- CByte
- CCur
- CDate
- CDbl
- Cint
- CLng
- CreateObject
- CSng
- CStr
- DatePart
- DateSerial
- DateValue
- Day
- Fix
- FormatCurrency
- FormatDateTime
- FormatNumber
- Hex
- Hour
- InputBox
- InStr
- Int
- IsArray
- IsDate
- IsEmpty
- IsNull
- IsNumeric
- LBound
- LCase
- Left
- Len
- Log
- LTrim
- Mid
- Minute
- Month
- MonthName
- MsgBox
- Replace
- Right
- Rnd
- RTrim
- Second
- Sgn
- Space
- StrComp
- String
- Timer
- TimeSerial
- TimeValue
- UBound
- UCase
- Weekday
- WeekdayName
- Year
All existing customized functions and procedures available in Pascal (starting with ps…) are also availble in the Basic Scription Engine:
function ChangeFileExt(const FileName, Extension: string): string
function DeleteFile(const FileName: string): Boolean
function FileAge(const FileName: string): Integer
function FileDateToDateTime(FileDate: Integer): TDateTime
function FileExists(const FileName: string): Boolean
function FileGetAttr(const FileName: string): Integer
function FileSetAttr(const FileName: string; Attributes: Integer): Integer
function RenameFile(const OldName, NewName: string): Boolean
function ExtractFileName(const FileName: string): string
function ExtractFileExt(const FileName: string): string;
function ExtractFilePath(const FileName: string): string
function CreateDir(const Dir: string): Boolean
function ForceDirectories(const Path : string): Boolean
function DirectoryExists(const Directory : string): Boolean
function DiskFree(Drive: Byte): Int64
function DiskSize(Drive: Byte): Int64
function RemoveDir(const Dir: string): Booleanfunction RemovePath(const Path: string): Boolean
function psGetShellLinkAppPath(Const aLinkFileName: String; Var aAppPath: String): Boolean
function psGetShellLinkAppPathEx(Const aLinkFileName: String; Var aAppPath, aInfo: String): Boolean
function psDateUTC: TDateTime
function psNowUTC: TDateTime
function psGMTToLocalTime(GMTTime: TDateTime): TDateTime
function psLocalTimeToGMT(LocalTime: TDateTime): TDateTime
Function psStrInternetToDateTime(Const aRfc822Str: String; aLocal: Boolean): TDateTime
Function psDateTimeToStrInternet(Const aDateTime: TDateTime; aLocal: Boolean): String
Function psGetUrlEncoded(Const aValue: String): String
Function psGetUrlContent(Const aUrl, aParams: String; var aError: String): String
Function psHtmlToPdfFile(Const aHTML, aPdfFile: String): String
Function psHtmlToPdfFileEx(Const aHTML, aPdfFile: String; Const aOptions: TStringList): String
Function psHtmlToText(Const aHTML: String; Var aText: String): String
Function psHtmlToTxtFile(Const aHTML, aTxtFile: String): String
Function psHtmlFileToTxtFile(Const aHTMLFile, aTxtFile: String): String
Function psHtmlToXml(Const aHTML: String; Var aXml: String): String
Function psHtmlToXmlFile(Const aHTML, aXmlFile: String): String
Function psHtmlFileToXmlFile(Const aHTMLFile, aXmlFile: String): String
// Masks
function MatchesMask(Const Filename, Mask: String): Boolean
// SysUtils
function CompareText(const S1, S2: string): Integer
function SameText(const S1, S2: string): Boolean
function UIntToStr(Value: Cardinal): string
// StrUtils
function LeftStr(const AText: String; const ACount: Integer): String
function RightStr(const AText: String; const ACount: Integer): String
function MidStr(const AText: String; const AStart, ACount: Integer): String
function PosEx(const SubStr, S: string; Offset: Integer): Integer
function psLeftPad(s: String; Ch: char; Len: Integer): String
function psRightPad(s: String; Ch: char; Len: Integer): String
function psStringReplace(const aValue: string; aOldPattern: string; aNewPattern: string): string
Procedure psStringReplaceExt(Var aValue: String; aOldPattern: String; aNewPattern: String)
// StringList
Function psSaveListToFile(aList: TStringList; Const aFile: String; Const aTrailingLineBreak: Boolean): String
Function psSaveListToFileExt(aList: TStringList; Const aFile: String; Const aTrailingLineBreak: Boolean; Const aLineBreak: String): String
// Date&Time
function DayOfTheWeek(const AValue: TDateTime): Word
function DayOfTheMonth(const AValue: TDateTime): Word
function DayOfTheYear(const AValue: TDateTime): Word
function WeekOfTheYear(Const aValue: TDateTime): Word
function MonthOfTheYear(const AValue: TDateTime): Word
function TimeToStr(const DateTime: TDateTime): string
function DateTimeToStr(const DateTime: TDateTime): string
function psDateToStr(Const Value: TDateTime; Const DateFormat: String): String
function psDateTimeToStr(Const Value: TDateTime; Const DateFormat, TimeFormat: String): String
function psTimeToStr(Const Value: TDateTime; Const TimeFormat: String): String
function psStrToDateTime(Const Value, DateFormat, TimeFormat: String; Const DateSeparator, TimeSeparator: Char): TDateTime
function psStrToDateTimeEx(Const Value, LocalName, DateFormat, TimeFormat: String; Const DateSeparator, TimeSeparator: Char): TDateTime
function psStrToDate(Const Value, DateFormat: String; Const DateSeparator: Char): TDateTime
function psStrToDateEx(Const Value, LocalName, DateFormat: String; Const DateSeparator: Char): TDateTime
function psStrToTime(Const Value, TimeFormat: String; Const TimeSeparator: Char): TDateTime
function CurrentYear: Word
function EndOfAWeek(Const aYear, aWeekOfYear, aDayOfWeek: Word): TDateTime
function StartOfAWeek(Const aYear, aWeekOfYear, aDayOfWeek: Word): TDateTime
function EndOfAMonth(Const aYear, aMonth: Word): TDateTime
function StartOfAMonth(Const aYear, aMonth: Word): TDateTime
function EndOfTheWeek(Const aValue: TDateTime): TDateTime
function StartOfTheWeek(Const aValue: TDateTime): TDateTime
function EndOfTheMonth(Const aValue: TDateTime): TDateTime
function StartOfTheMonth(Const aValue: TDateTime): TDateTime
function psIncSecond(const AValue: TDateTime; const ANumberOfSeconds: Int64): TDateTime
function psIncMinute(const AValue: TDateTime; const ANumberOfMinutes: Int64): TDateTime
function psIncHour(const AValue: TDateTime; const ANumberOfHours: Int64): TDateTime
function psIncDay(const AValue: TDateTime; const ANumberOfDays: Integer): TDateTime
function psIncWeek(const AValue: TDateTime; const ANumberOfWeeks: Integer): TDateTime
function psIncMonth(const DateTime: TDateTime; NumberOfMonths: Integer): TDateTime
function psIncYear(const AValue: TDateTime; const ANumberOfYears: Integer): TDateTime
function psCanWriteToFolder(const folderName: string): boolean
function psConnectToNetworkResource(const networkResource: string; const mappedLetter: string; const username: string; const password: string): boolean
function psDisconnectFromNetworkResource(mappedLetter: char; updateProfile: boolean): boolean
procedure psDeleteFiles(const folder, fileMask: string)
procedure psDeleteTree(const folder: string; removeSubdirsOnly: boolean)
function FileSize(const fileName: string): int64
// Memory
function psMMGetCurrentMemoryUsage: Int64
function psMMLogStateToFile(const aFilename: string): Boolean
function psMMProcessAllPendingFrees: Boolean
// File
function psCreateDummyTxtFile(Const aPath: String): String
function psGetValidFile(Const aFile: String): String
function psGetValidFileName(Const aFileName: String): String
function psGetCrc32FromFile(Const aFileName: String): String
// Path
function psGetTempPath: String
function psCreatePath(Const _Path: String): Boolean
function psCreatePath2(Const _FileName: String): Boolean
function psGetParentPath(Const aPathName: string): String
// Excel
function psConvertXlsFile(Const aSrcFile, aDstFile: String; Const aFormat: Integer; Const aDelimiter: Char; Const aEncoding: Integer; Const aSheet: String): Boolean
// IP
function psGetIPAddress(const HostName: string): string
procedure psGetIpAddresses(Results: TStrings)
// Custom
function psAppendTxtFile(Const _InFileName: String; Const _OutFileName: String; Const _Trim: Boolean): Boolean
function psSaveTxt2File(_Text, _Destination: String; _Encoding: String; _WriteBOM: Boolean): Boolean
function psChangeTxtEncodingNoBOM(_Source, _Destination: String; _Encoding: integer): Boolean
function psChangeTxtEncoding(_Source, _Destination: String; _Encoding: integer): Boolean
function psChangeTxtEncodingExt(_Source, _Destination: String; _SrcEncoding, _DstEncoding: Integer; _WriteBOM: Boolean): Boolean
function psChangeTxtEncodingCk(_Source, _Destination: String; _SrcCharset, _DstCharset: String; _WriteBOM: Boolean; _ErrorAction: Integer): Boolean
function psChangeTxtEncodingCkExt(aSrc, aDst: String; aSrcCharset, aDstCharset: String; aWriteBOM, WriteFileIfModified: Boolean): Boolean
function psLoadFromFileTxtEncoding(Const aSource: string; aEncoding: Integer): String
function psVerifyTxtEncodingCk(aFilename: String; aCharset: String): Boolean
function psChangeTxtLineBreak(_Source, _Destination: String; _LineBreak: String): Boolean
function psCopyFile(_Source, _Destination: string; _FailIfExists: boolean): boolean
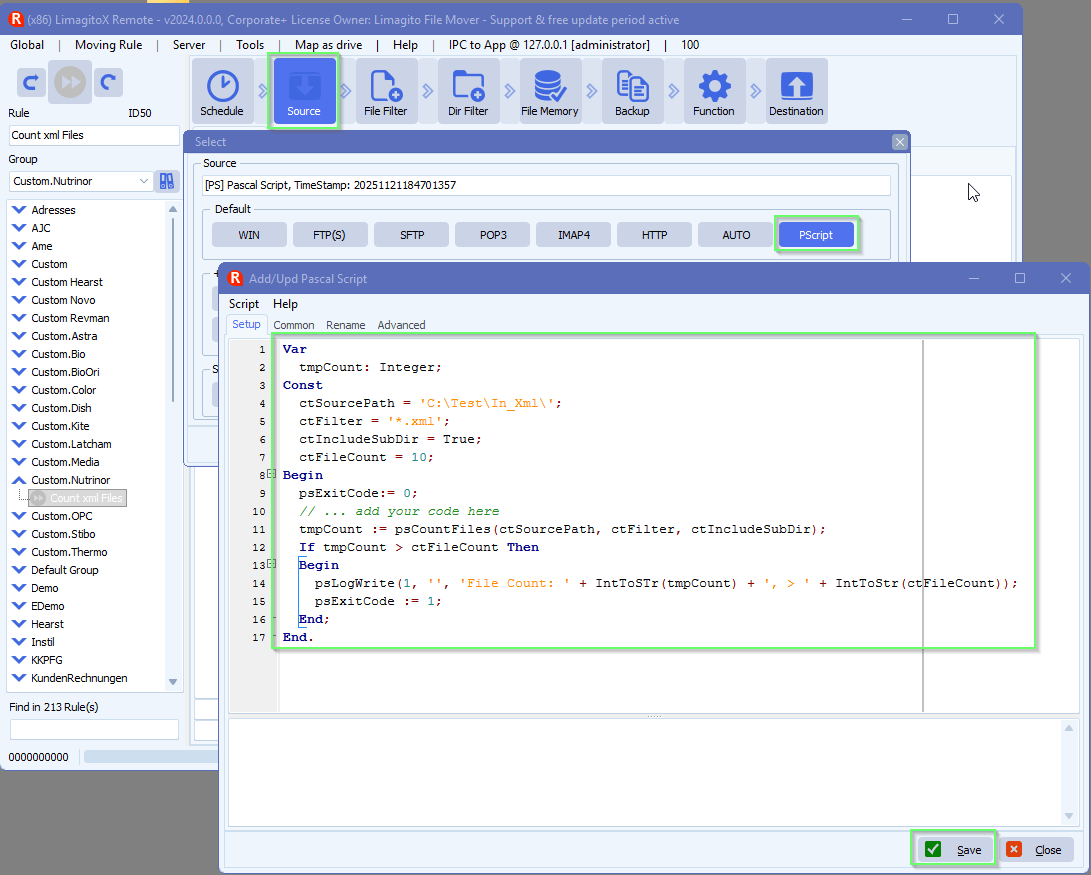
function psCountFiles(_Directory: String; _FilenameFilter: String; _IncludeSubDirectory: boolean): integer
function psAddToRuleSourceFiles(const aRuleId: Integer; const aFile: String): Boolean
function psAddToRuleSourceFilesEx(const aRuleId: Integer; const aFile: String; aFunction: Integer): Boolean
function psCreateProcess(_ApplicationName: string; _CommandLine: string; _CurrentDirectory: string; _ShowWindow: integer; _WaitForTerminate: boolean): cardinal
function psCustomDirFilter01(_Source: String; Var _DirFilter: String; _Versions: integer): Boolean
function psCustomFileFilter01(_Source: String; Var _FileFilter: String; _Versions: integer): boolean
function psFormatFloatStr(Value: string; DecimalSeparator, ThousandSeparator: Char; ResultFormat: String): string
function psExecuteRule(_RuleId: integer): boolean
function psExecuteRuleAndWait(_RuleId: integer; _Timeout: integer): Boolean
function psGetDisabledRuleList(Const aIncGroupname, aIncRuleName, aIncRuleID: Boolean; Const aDelimiter, aQuoteChar: Char): String
function psGetEnabledRuleList(Const aIncGroupname, aIncRuleName, aIncRuleID: Boolean; Const aDelimiter, aQuoteChar: Char): String
function psFileInUse(const _FileName: String): boolean
function psGetOldestFilename(Directory: String; FilenameFilter: String; IncludeSubDirectory: boolean): String
function psGetOldestFilenameEx(Directory: String; FilenameFilter: String; IncludeSubDirectory: boolean): String
function psGetYoungestFilename(Directory: String; FilenameFilter: String; IncludeSubDirectory: boolean): String
function psGetYoungestFilenameEx(Directory: String; FilenameFilter: String; IncludeSubDirectory: boolean): String
function psGetOldestFileDate(Directory: String; FilenameFilter: String; IncludeSubDirectory: boolean): TDateTime
function psGetYoungestFileDate(Directory: String; FilenameFilter: String; IncludeSubDirectory: boolean): TDateTime
function psListFiles(Directory: String; FilenameFilter: String; IncludeSubDirectory: boolean): TStringList
function psListFilesEx(Directory: String; FilenameFilter: String; IncludeSubDirectory: boolean): TStringList
Procedure psListPaths(Directory: String; DirectoryFilter: String; DirectoryLevel: integer; Var Paths: TStringList)
function psMoveFile(_Source, _Destination: string): boolean
Function psSimpleDecryptFile(_Source, _Destination, _Key: String; _IVAtBeginning: Boolean): Boolean
Function psSimpleEncryptFile(_Source, _Destination, _Key: String; _IVAtBeginning: Boolean): Boolean
Function psPathOfFile(const _Directory: String; const _Filename: String): string
Function psPathsOfFile(const _Directory: String; const _Filename: String): string
function psPathOfFileMask(Const _Directory: String; Const _FileMask: String): String
function psPing(_Host: string): boolean
function psRuleIsRunning(_RuleId: integer): boolean
function psRuleSetHoldStatus(_RuleId: Integer): Boolean
function psRuleSetReleaseStatus(_RuleId: Integer): Boolean
function psTerminateRule(_RuleId: integer): boolean
function psTerminateRuleAndWait(_RuleId: integer; _Timeout: integer): boolean
function psUnZip(Source: String; Destination: String; Password: String; Overwrite: boolean): boolean
function psWinZip(Source: String; Destination: String; Password: String; Overwrite: boolean): boolean
function psWinZipEx(Source: String; Destination: String; Password: String; Overwrite: integer): boolean
function psZip(Source: String; Destination: String; Password: String; Overwrite: boolean): boolean
function psZipEx(Source: String; Destination: String; Password: String; Overwrite: integer): boolean
function psZipLevel(Source: String; Destination: String; Password: String; Overwrite: boolean; Level: Cardinal): boolean
function psWinZipLevel(Source: String; Destination: String; Password: String; Overwrite: boolean; Level: Cardinal): boolean
function ps7zCompress(Source: String; Destination: String; Password: String; Options: TStringList): Boolean
function ps7zCompressEx(Source: String; SourceFiles: TStringList; Destination: String; Password: String; Options: TStringList): Boolean
Procedure psSleep(Const _Milliseconds: Cardinal)
function psGetRuleDstRefreshTokenExpDate(Const aRuleId, aDstId: Integer): TDateTime
function psGetRuleDstRefreshTokenRecDate(Const aRuleId, aDstId: Integer): TDateTime
function psGetRuleDstFormDigestExpDate(Const aRuleId, aDstId: Integer): TDateTime
function psGetRuleError(_RuleId: integer): Boolean
function psSetRuleError(_RuleId: integer; _Value: Boolean): Boolean
function psGetFileChecksum(Const _FileName: String; Const _HashType: Integer): String
function psGetCreationTime(const aPath: string): TDateTime
function psGetCreationTimeUtc(const aPath: string): TDateTime
function psGetLastAccessTime(const aPath: string): TDateTime
function psGetLastAccessTimeUtc(const aPath: string): TDateTime
function psGetLastWriteTime(const aPath: string): TDateTime
function psGetLastWriteTimeUtc(const aPath: string): TDateTime
function psGetDefaultPrinter: String
function psGetPrinters: String
function psGetPrinterInfo(Const aPrinterName: String; Var aSuccess: Boolean; Var aInfo: String): TStringList
function psGetPrinterStatusInfo(Const aStatus: Cardinal): TStringList
function psSendStrToPrinter(Const aValue, aHost: String; Const aPort, aConnectTimeOut, aReadTimeout: Integer; var aSuccess: Boolean): Byte
function psPrintFile(aFile: String; aPrinterName: String): String
function psPrintRawString(aString: String; aPrinterName: String): String
function psPrintRawList(aList: TStringList; aPrinterName: String): String
function psInt64ToInt(Const aInt64: int64): Integer
function psAdd2FilesToDelOnRuleEnd(aRuleId: integer; aFile: String): Boolean
function psClearFilesToDelOnRuleEnd(aRuleId: integer): Boolean
function psCountFilesToDelOnRuleEnd(aRuleId: integer): Integer
// DelimitedText
function psDelimitedTextAsList(Delimiter: String; Text: String): TStringList
function psDelColumnFromDelimitedText(Delimiter: Char; QuoteChar: Char; Text: String; Column: Integer): String
function psDuplicateColumnFromDelimitedText(Delimiter: Char; QuoteChar: Char; Text: String; ColumnFrom, ColumnTo: Integer): String
function psInsertColumnFromDelimitedText(Value: String; Delimiter: Char; QuoteChar: Char; Text: String; Column: Integer): String
function psMoveColumnFromDelimitedText(Delimiter: Char; QuoteChar: Char; Text: String; ColumnFrom, ColumnTo: Integer): String
function psFormatFloatStrColumnFromDelimitedText(Delimiter: Char; QuoteChar: Char; Text: String; Column: Integer; DecimalSeparator, ThousandSeparator: Char; ResultFormat: String): String
Function psValueColumnFromDelimitedText(Value: String; Delimiter: Char; QuoteChar: Char; Text: String; Column: Integer): String
function psLeftValueExistsColumnFromDelimitedText(Value: String; Delimiter: Char; QuoteChar: Char; Text: String; Column: Integer): Boolean
function psValueExistsColumnFromDelimitedText(Value: String; Delimiter: Char; QuoteChar: Char; Text: String; Column: Integer): Boolean
// PDF
function psPdfSplitPages(SourceFile, DestinationFolder: String; PadLength: Integer): Boolean
function psPdfGetPageHeight(Const aSourceFile, aPassword: String; Const aIndex: Integer; var aHeight: Double): Boolean
function psPdfGetPageWidth(Const aSourceFile, aPassword: String; Const aIndex: Integer; Var aWidth: Double): Boolean
function psPdfGetPageCount(Const aSourceFile, aPassword: String; var aCount: Integer): Boolean
// Rule
Function psSaveRuleReportsAsHTML(Const aPath: String): String
Function psExportRuleDataAsCSV(Const aFile, aData: String; Const aDelimiter: Char): String
// XML
function psXMLFileSearchAllForContent(Const aXMLFile, aPattern: String; Var aValues: TStringList): String
function psXMLFileSearchForTag(Const aXMLFile, aChild, aTag: String; Var aValues: TStringList): String
function psXMLFileSearchForAttribute(Const aXMLFile, aChild, aTag, aAttr, aPattern: String; Var aValues: TStringList): String
function psXMLGetAttribute(Const aXML, aRootNode, aChildNode, aAttrName: String): String
function psXMLSetAttribute(Const aXML, aRootNode, aChildNode, aAttrName, aAttrValue: String): String
// XML > JSON
function psXmlFileToJSONFile(Const aXmlFile, aJsonFile: String; Const aXmlPack, aJsonIndent, aJsonEscape: Boolean): String
function psXmlFileToParsedXmlText(Const aXmlFile: String; Const aXmlPack: Boolean): String
function psXmlTextToJSONFile(Const aXmlText, aJsonFile: String; Const aXmlParse, aXmlPack, aJsonIndent, aJsonEscape: Boolean): String
If you need any help about this new ‘Basic language scripter’ option, please let us know.
Best Regards,
Limagito Team
#basic #managedfiletransfer #filetransfer #filemanagement