Installation

  • 29 Dec

    How-To Use LimagitoX File Mover as Service

    1. Install the latest version (v2018 or higher)
    2. Start the LimagitoX File Mover Config tool
      • Import the new License using the <Import> function (License File tab of the Config tool)
      • Click <Install> (Service tab of the Config tool). Don’t start the Service yet!
      • Open Services.msc
        • Search for LimagitoX service.
        • Change the ‘logon as’ user to a user with sufficient rights!
        • The ‘logon as’ user should belong to the ‘Local Administrator’ group of the system where the service is installed on.
        • Close Services.msc
      • Click <Add 2 Firewall> (Service Tab of the Config tool)
      • Click <Start> (Service Tab of the Config tool)
      • Close Config Tool
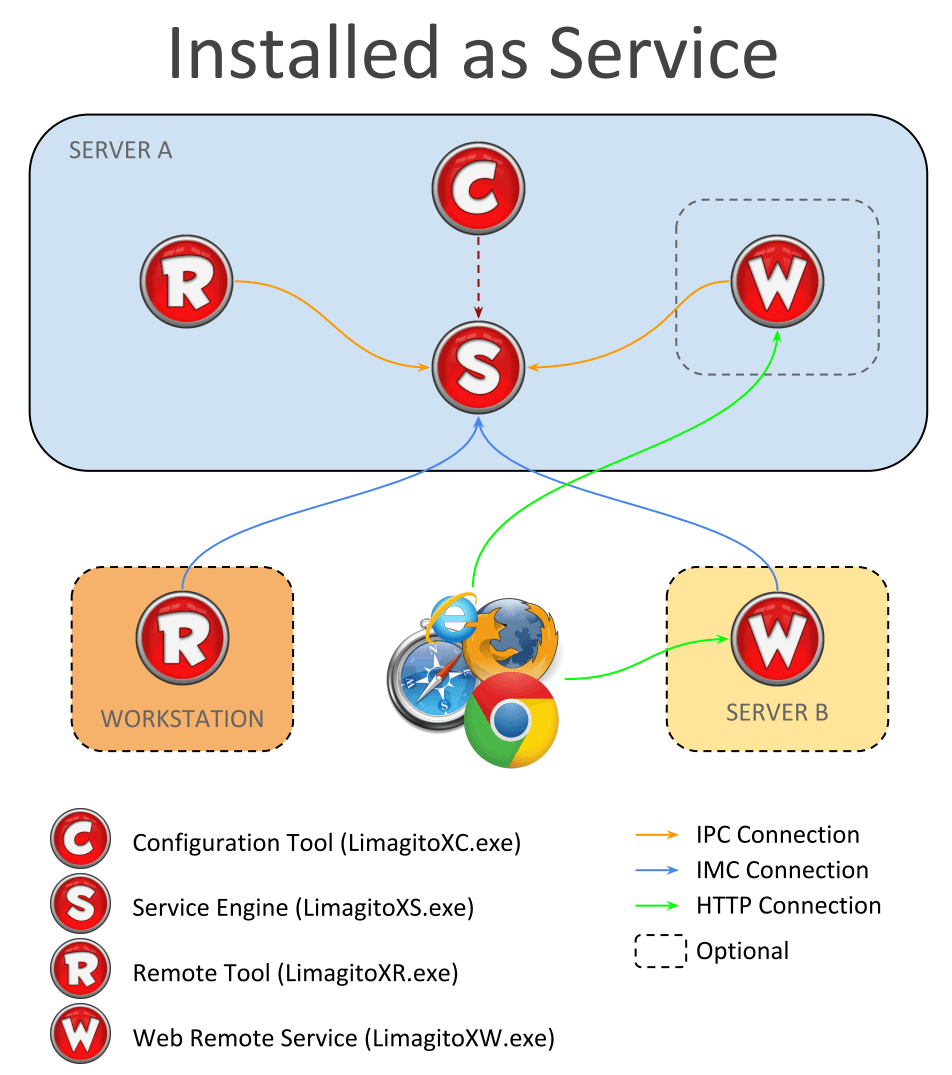
      • The running Service is the engine doing all the file transfers.
    3. Start LimagitoX File Mover Remote tool
      • Select destination: ‘LimagitoX Service’
      • Click <Connect> and <OK>
    4. You are now remotely connected to the service.
      • All Setup is done using this Remote tool
      • You can close the Remote tool when you are finished (it does not need to run).
    5. Done
    6. Optional: Our Web Remote Service can be installed to fully control the File Mover Service using your browser. Please check the ‘Installation.pdf’ to install the Web Remote Service.
    By Limagito-Team Installation ,
  • 03 Oct

    Using multiple instances of our Limagito Filemover Tool

    Howto: “Using multiple instances of Limagito Filemover, version v2017 and higher”

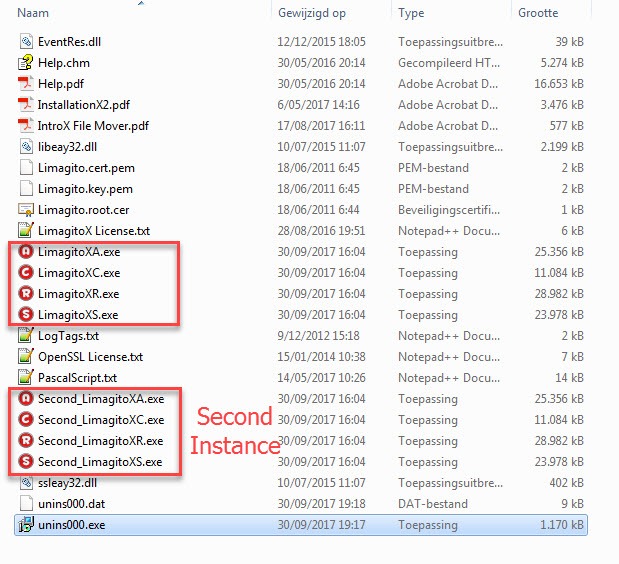
    • Open Program Folder of Limagito X File Mover
      • C:\Program Files\LimagitoX File Mover or C:\Program Files\LimagitoX File Mover (x86)
    • Copy and rename the following files
      • LimagitoXA.exe
      • LimagitoXC.exe
      • LimagitoXR.exe
      • LimagitoXS.exe
      • LimagitoXW.exe
    • Important about the rename: you MUST add a PREFIX to the original filenames.
      • ! Do NOT use a dash or space !
    • In the example below I’ve added “Second_” as prefix.
      • Second_LimagitoXA.exe
      • Second_LimagitoXC.exe
      • Second_LimagitoXR.exe
      • Second_LimagitoXS.exe
      • Second_LimagitoXW.exe (be sure to use a different port for the second Web Remote instance, default is 8077)
    • Now your second instance is ready.

    How To use the second instance of the File Mover:

    • Use Second_LimagitoXC.exe to start the config tool of the second File Mover instance:
    1. Import the license file
    2. Install the File Mover Service
    3. Adjust the ‘Logon As’ user of the second File Mover instance (services.msc)
    4. Optional: Install the Web Remote Service (different Tab)
    5. Optional: Adjust the ‘Logon As’ user of the second Web Remote  instance (services.msc)
    6. Start the File Mover Service
    • Use Second_LimagitoXR.exe to start the Remote Tool of the second File Mover instance:
    1. Connect to the second File Mover instance running as Service


    If you need any help with the ‘multiple instances’ setup, please let us know.

    Best Regards,

    Limagito Team
    By Limagito-Team Installation ,
  • 03 Sep

    User Accounts option, part 2

    We’ve added the possibility to select the ‘Allowed Rules’ for each created user. The ‘administrator’ user is fixed and has full access to all rules. The ‘administrator’ is the only user who is allowed to access the ‘Accounts’ setup.

    A second tab allows you to control the options that are allowed for each user. The ‘administrator’ user has full access to all options.

    We’ll keep adding more selection options so you can fully control user access to our file mover.

    Regards,

    Limagito Team

    By Limagito-Team Accounts Installation ,
1 2 3 4 5
SEARCH